一、新建工程
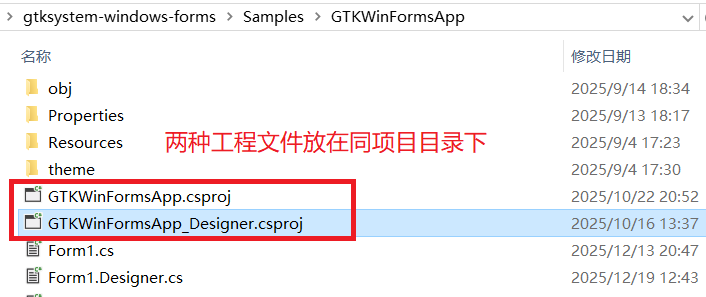
说明:【AB双工程方案】在项目解决方案里创建两个工程:原生框架Windows应用工程和GTKSystem框架应用工程。原生工程主要用于设计窗体、开发程序;GTKSystem工程主要用于开发程序、编译发布跨平台程序。这两个工程使用同一目录和工程文件,以下教程以GTKWinFormsApp为例。
A)、 使用C#创建windows窗体应用程序
- 按微软原生方法 使用C#创建windows窗体应用程序,命名为GTKWinFormsApp_Designer(自定义命名),创建工程后,修改工程属性:【输出类型】选择“window应用程序”,【目标框架】选择.NET5或以上版本。创建成功后,即可开发程序。
- 工程创建成功后,可以直接创建窗体,直接编辑设计窗体,直接开发程序。
下面是工程属性配置:
<PropertyGroup>
	<OutputType>WinExe</OutputType>
	<TargetFramework>net8.0-windows8.0</TargetFramework>
	<Nullable>enable</Nullable>
	<UseWindowsForms>True</UseWindowsForms>
</PropertyGroup>
B)、创建GTKSystem.Windows.Forms框架的windows窗体应用程序,生成跨平台程序
- 打开项目所在目录,通过复制工程GTKWinFormsApp_Designer.csproj文件创建新文件(或者像A一样操作,新建一个工程),重新命名,如GTKWinFormsApp.csproj(自定义命名)。
- 把新建的GTKWinFormsApp.csproj工程添加到A项目的解决方案中。
- 从右键菜单中打开项目工程属性,【输出类型】选择“window应用程序”,【目标框架】选择.NET5或以上版本,【windows窗体】去掉勾选 “为该项目启动windows窗体”(配置代码<UseWindowsForms>为false)。
- 引用安装GtkSharp(3.24.24.95)、GTKSystem.Windows.Forms
- 检查form表单是否有使用图像资源,如果使用,需新建System.Resources.ResourceManager和System.ComponentModel.ComponentResourceManager,具体请看下面内容。
- 【可选项】安装本下载包里的【VisualStudio开发插件】,用于添加窗体创建模板(可以不安装此插件,使用A工程设计窗体,具体请看窗体设计器教程)。
- 打开窗体设计器:此工程无法直接打开窗体设计器,需要另外配置,看教程窗体设计器教程,建议直接用A工程设计窗体。
下面是工程属性配置(重要<UseWindowsForms>False</UseWindowsForms>):
<PropertyGroup>
	<OutputType>WinExe</OutputType>
	<TargetFramework>net8.0-windows8.0</TargetFramework>
	<Nullable>enable</Nullable>
	<UseWindowsForms>False</UseWindowsForms>
</PropertyGroup>
  <ItemGroup>
    <PackageReference Include="GtkSharp" Version="3.24.24.95" />
    <PackageReference Include="GTKSystem.Windows.Forms" Version="1.3.24.89" />
  </ItemGroup>
二、检查开发工程配置:
A工程不需要修改,主要检查B工程(GTKWinFormsApp.csproj),以下配置在你的项目工程里操作,如果项目里没有使用资源图像文件,可以不用配置【4】【5】项:
1、GTKWinFormsApp.csproj
检查GTKWinFormsApp.csproj配置代码,<UseWindowsForms>为False
<Project Sdk="Microsoft.NET.Sdk.WindowsDesktop">
  <PropertyGroup>
    <OutputType>WinExe</OutputType>
    <TargetFramework>net8.0</TargetFramework>
    <UseWindowsForms>False</UseWindowsForms>
2、引用DLL或工程项目:GTKSystem.Windows.Forms
3、新建添加配置文件Directory.Build.props,上面AB工程都同时需要此文件,配置如下:
<Project>
	<PropertyGroup>
		<BaseIntermediateOutputPath>obj\$(MSBuildProjectName)</BaseIntermediateOutputPath>
		<IntermediateOutputPath>$(BaseIntermediateOutputPath)\$(TargetFramework)</IntermediateOutputPath>
	</PropertyGroup>
	<ItemGroup Condition="('$(ImplicitUsings)' == 'true' or '$(ImplicitUsings)' == 'enable')">
		<Using Include="System" />
		<Using Include="System.Collections.Generic" />
		<Using Include="System.Drawing" />
		<Using Include="System.IO" />
		<Using Include="System.Linq" />
		<Using Include="System.Threading" />
		<Using Include="System.Threading.Tasks" />
		<Using Include="System.Windows.Forms" />
	</ItemGroup>
</Project>
4、【可选项】从NuGet安装GTKSystem.Windows.FormsDesigner,用于开启窗体设计器,AB工程方案下通常不需要安装,可选装。
使用窗体设计器有几种方法,详细的使用教程可以访问https://www.gtkapp.com/formsdesigner
5、【可选项】新建System.Resources.ResourceManager类
在项目下新建System.Resources.ResourceManager类,继承GTKSystem.Resources.ResourceManager,用于覆盖原生System.Resources.ResourceManager类。 GTKSystem.Resources.ResourceManager实现了项目资源文件和图像文件读取。 如果项目里没有使用资源图像文件,可以不用新建此文件。
System.Resources.ResourceManager类
文件名:System.Resources.ResourceManager.cs
using System.Diagnostics.CodeAnalysis;
using System.Reflection;
namespace System.Resources
{
    public class ResourceManager: GTKSystem.Resources.ResourceManager
    {
        public ResourceManager([DynamicallyAccessedMembers(DynamicallyAccessedMemberTypes.All)] System.Type resourceSource) : base(null, null, resourceSource)
        {
        }
        public ResourceManager(string baseName, Assembly assembly) : base(baseName, assembly, null)
        {
        }
        public ResourceManager(string baseName, Assembly assembly, [DynamicallyAccessedMembers(DynamicallyAccessedMemberTypes.All)] System.Type resourceSource) : base(baseName, assembly, resourceSource)
        {
        }
        protected ResourceManager()
        {
        }
    }
}
6、【可选项】新建System.ComponentModel.ComponentResourceManager类
在项目下新建System.ComponentModel.ComponentResourceManager类,继承GTKSystem.ComponentModel.ComponentResourceManager,用于覆盖原生System.ComponentModel.ComponentResourceManager类。
GTKSystem.ComponentModel.ComponentResourceManager实现了项目资源文件和图像文件读取(调用GTKSystem.Resources.ResourceManager)。 如果项目里没有使用资源图像文件,可以不用新建此文件。
System.ComponentModel.ComponentResourceManager类
文件名:System.ComponentModel.ComponentResourceManager.cs
using System.Diagnostics.CodeAnalysis;
using System.Globalization;
namespace System.ComponentModel
{
    public class ComponentResourceManager:GTKSystem.ComponentModel.ComponentResourceManager
    {
        public ComponentResourceManager([DynamicallyAccessedMembers(DynamicallyAccessedMemberTypes.All)] Type form):base(form)
        {
        }
        public new object GetObject(string name, CultureInfo culture)
        {
            return GetObject(name);
        }
        public new object GetObject(string name)
        {
            return base.GetObject(name);
        }
    }
}
三、Resources资源的使用
1、增加存放资源文件夹Resources
具体请看下面的【全局共享资源Properties/Resources.resx】和【窗体独占资源Form.resx】的使用方法。 一般情况下,单个图片资源可以直接兼容原生使用,可以无需额外配置,图片组资源则必须把图片文件存放到Resources文件夹下。
在项目下和编译输出目录下创建Resources文件夹,把Resources资源存放的图片复制到Resources文件夹,此文件夹和文件全部生成到工程项目编译输出目录下。
2、使用全局共享资源Properties/Resources.resx
新建System.Resources.ResourceManager类
在项目下新建System.Resources.ResourceManager类,继承GTKSystem.Resources.ResourceManager,用于覆盖原生System.Resources.ResourceManager类。 GTKSystem.Resources.ResourceManager实现了项目资源文件和图像文件读取。 如果项目里没有使用资源图像文件,可以不用新建此文件。
新建System.ComponentModel.ComponentResourceManager类
在项目下新建System.ComponentModel.ComponentResourceManager类,继承GTKSystem.ComponentModel.ComponentResourceManager,用于覆盖原生System.ComponentModel.ComponentResourceManager类。
GTKSystem.ComponentModel.ComponentResourceManager实现了项目资源文件和图像文件读取(调用GTKSystem.Resources.ResourceManager)。 如果项目里没有使用资源图像文件,可以不用新建此文件。
3、使用窗体独占资源Form.resx
新建System.ComponentModel.ComponentResourceManager类
在项目下新建System.ComponentModel.ComponentResourceManager类,继承GTKSystem.ComponentModel.ComponentResourceManager,用于覆盖原生System.ComponentModel.ComponentResourceManager类。
GTKSystem.ComponentModel.ComponentResourceManager实现了项目资源文件和图像文件读取(调用GTKSystem.Resources.ResourceManager)。 如果项目里没有使用资源图像文件,可以不用新建此文件。
由于GTKSystem无法读取图片组(ImageList),需要把图片组的图片存入到项目的Resources文件夹下(或者通过自写程序添加图片,则不需要在Resources目录放置图片),如:
Form2.Designer.cs的配置程序如下:
 imageList1.ImageStream = (ImageListStreamer)resources.GetObject("imageList1.ImageStream");
 imageList1.TransparentColor = System.Drawing.Color.Transparent;
 imageList1.Images.SetKeyName(0, "010.jpg");
 imageList1.Images.SetKeyName(1, "timg2.jpg");

那么需要把图片010.jpg和timg2.jpg复制到文件夹Resources或Resources/Form2(所属窗体名)。

或者通过程序添加:
 imageList1.Images.Add("010.jpg",image1);
 imageList1.Images.Add("timg2.jpg",image2);
 imageList1.Images.SetKeyName(0, "010.jpg");
 imageList1.Images.SetKeyName(1, "timg2.jpg");
四、支持第三方图表和图像组件
- 开源图表组件推荐:OXYPlot;
- 2D图像处理组件推荐:ImageSharp;
- 3D图像处理推荐:AssimpNet(解析3D格式文件数据),OpenTK /OpenGL(渲染3D图像)
五、如何运行软件
- windows下直接编译发布运行,Debug目录的demo_app.exe文件或demo_app.dll文件都可以直接运行。
- linux和macos下执行命令运行: > dotnet <app path>/demo_app.dll。
- 通过visual studio发布独立应用程序(部署模式为“独立”),可直接双击运行(可能需要授权:sudo chmod +x demoapp)。
1、制作友好的启动方式
- 制作desktop快捷方式,通过鼠标双击即可启动软件。
- 制作sh文件,可以在sh文件里添加命令,通过调用sh文件启动,快捷方式也可以调用sh文件执行(有可能需要授权,如授权demo.sh:chmod +x demo.sh)。启动目录是容易引发问题的地方,先cd到程序根目录再启动程序是兼容性最好的方式,sh文件方便增加命令。
- 通过visual studio发布独立应用程序(“部署模式”:“独立”),还可把应用程序打包成单个文件(“文件发布选项”:“生成单个文件”),并且在各平台电脑上可以直接双击运行(注意:可能需要给应用程序增加权限才可以运行,授权命令:sudo chmod +x demoapp)。详细请查看https://learn.microsoft.com/zh-cn/dotnet/core/deploying/single-file
2、快捷方式制作方法
建一个文本文件,修改后缀名为.desktop(权限勾选可执行程序),用记事本打开文件,写入以下代码:
[Desktop Entry]
Type=Application
Version=1.0.0   # 软件版本
Name=english title
Name[zh_CN]=中文软件名字
Exec=<dotnet path>/dotnet <app path>  #如:/home/.dotnet/dotnet /home/test/你的App.dll 或$HOME/.dotnet/dotnet $HOME/test/你的App.dll。
#方法二:Exec=<软件所在目录>/xxapp.sh  #如:调用sh文件启动
Terminal=false  # 如果需要同时打开终端,则设为true,否则设为 false
Icon=<app icon path>  #如:/home/my/test/appicon.png
Categories=GTK;System
Type=Application
StartupNotify=true

注意:直接创建修改app.desktop可能会有执行权限问题,需要添加可执行权限
sudo chmod +x ~/Desktop/app.desktop